What are the Black Delusion Wukong bosses? Following the 81 trials that seem in Journey to the West, Sport Science’s inaugural motion RPG has a gauntlet of boss encounters that stand between the Destined One and his aim to resurrect the long-lost Solar Wukong. We’ve combed via every space on this arduous journey to uncover each predominant and non-obligatory boss so you possibly can clear each problem and reap the rarest boss rewards.
Bosses type the premise of development in Black Myth Wukong, and studying how one can beat them is the one method to full your first playthrough forward of Black Myth Wukong new game plus. Some bosses have a number of phases to catch you off-guard, whereas others could be weakened with secret objects discovered within the action-adventure game’s hidden areas. Whether or not you’re having bother towards a selected boss otherwise you’re after a useful guidelines to tick off each boss as you go, listed below are all of the Black Delusion Wukong bosses and how one can beat them.
All Black Delusion Wukong bosses
Listed here are all of the bosses in Black Delusion Wukong:

Black Wind Mountain
| Boss | Location | Reward |
| Erlang, the Sacred Divinity | Tutorial | N/A |
| Bullguard | Forest of Wolves, Entrance Hills | Immobilize (spell) |
| Guangzhi | Forest of Wolves, Exterior the Forest | Crimson Tide (transformation) |
| Wandering Wight | Forest of Wolves, Exterior the Forest | Cat’s Eye Beads (curio), Wandering Wight (spirit) |
| Lingxuzi | Forest of Wolves, Guanyin Temple | Gray Wolf Masks (headgear), Thoughts Core |
| Baw-Li-Guhh-Lang | Bamboo Grove, Snake Path | Baw-Li-Guhh-Lang (spirit), Tadpole |
| Guangmou | Bamboo Grove, Snake Path | Guangmou (spirit), Blood of the Iron Bull |
| Elder Jinchi | Secret: Historic Guanyin Temple, Grand Chamber | Fireproof Mantle (vessel) |
| Black Wind King | Black Wind Cave, Cave Inside | Cloud Step (spell) |
| Black Bear Guai | Black Wind Cave, Bodhi Peak | Craving Eyes (relic), Flame Ebongold, Yarn, Silk Yaoguai Core, Stone Spirit, Thoughts Core |

Yellow Wind Ridge
| Boss | Location | Reward |
| Lang-Li-Guhh-Baw | Sandgate Village, Village Entrance | Tadpole, Evil Repelling Medicament, Stone Spirit, Yaoguai Core |
| Earth Wolf | Sandgate Village, Village Entrance | Blood of the Iron Bull, Earth Wolf (spirit) |
| King of Flowing Sands & Second Rat Prince | Sandgate Village, Village Entrance | Blood of the Iron Bull, Stone Spirit, Yaoguai Core |
| First Prince of Flowing Sands | Sandgate Village, Valley of Despair | Arhat Gold Piece (key merchandise), Yarn, Silk |
| Man-in-Stone | Fright Cliff, Squall Hideout | Azure Mud (spell), Man-in-Stone service provider unlock |
| Mom of Stones | Fright Cliff, Squall Hideout | Stone Essence (key merchandise), Stone Spirit, Yaoguai Core |
| Stone Vanguard | Fright Cliff, Rockrest Flat | Sternness of Stone (key merchandise), Silk, Thoughts Core |
| Gore-Eye Daoist | Yellow Wind Formaation, Windseal Gate | Gore-Eye Daoist (spirit), Blood of the Iron Bull, Yarn, Silk |
| Yellow-Robed Squire | Fright Cliff, Rockrest Flat | Snout Masks (headgear), Kingdom of Sahali secret location unlock |
| “Tiger Vanguard” | Secret: Kingdom of Sahali, Sandgate Move | Tiger Tally (curio), Stone Spirit, Yaoguai Core |
| Fuban | Secret: Kingdom of Sahali, Sandgate Sure | Wind Tamer (vessel), Sky-Piercing Horn |
| Yellow Wind Sage | Crouching Tiger Temple, Cellar | Samadhi Wind Agate, Chilly Iron Leaves, Silk, Yaoguai Core, Refined Iron Sand, Thoughts Core |

The New West
| Boss | Location | Reward |
| Macaque Chief | Snowhill Path, Frost-Clad Path | N/A |
| Kang-Jin Loong | Snowhill Path, Mirrormere | Starlit Cloud-Bidden Antler, Refined Iron Sand |
| Captain Lotus-Imaginative and prescient | Pagoda Realm, Higher Pagoda | The Spirit of Captain Lotus-Imaginative and prescient (key merchandise) |
| Captain Sensible-Voice | Pagoda Realm, Mani Wheel | The Spirit of Captain Sensible-Voice (key merchandise), Thoughts Core, Refined Iron Sand |
| Macaque Chief | Pagoda Realm, Warding Temple | N/A |
| Kang-Jin Star | Turtle Island, Bitter Lake | Loong Pearl, Chilly Iron Leaves |
| Chen Loong | North Shore, Bitter Lake | Chilly Iron Leaves |
| Yin Tiger | Zodiac Village, Village Entrance | TBA |
| Apramana Bat | North Shore, Bitter Lake | Turtle Tear (soak) |
| Non-White | Valley of Ecstasy, Mindfulness Cliff | Non-White (spirit) Chilly Iron Leaves |
| Non-Ready | Valley of Ecstasy, Forest of Felicity | Non-Ready (spirit), Blood of the Iron Bull, Chilly Iron Leaves |
| Lang-Li-Guhh-Lang | Valley of Ecstasy, Forest of Felicity | Tadpole, Yaoguai Core, Refined Iron Sand |
| Outdated Ginseng Guai | Valley of Ecstasy, Forest of Felicity | Ginseng Cape (chest), Blood of the Iron Bull, Millennium Ginseng Seed |
| Captain Kalpa-Wave | Valley of Ecstasy, Longevity Street | The Spirit of Captain Kalpa-Wave (key merchandise), Chilly Iron Leaves, Thoughts Core |
| Macaque Chief | New Thunderclap Temple, Mahavira Corridor | Yaoguai Core, Refined Iron Sand |
| Yellowbrow | New Thunderclap Temple, Mahavira Corridor | Hubris Nostril (relic), Cosmo Radiance, Tremendous Gold Thread, Chilly Iron Leaves, Refined Iron Sand, Gold Tree Core, Thoughts Core |

The Webbed Hole
| Boss | Location | Reward |
| Second Sister | Village of Lanxi, Property of the Zhu | Gold Tree Core, Venomous Hair |
| Centipede Guai | Webbed Hole, Center Hole | Centipede Guai (spirit), Knot of Voidness, Gold Tree Core |
| Buddha’s Proper Hand | Webbed Hole, Center Hole | Previous-Echo (key merchandise), Tremendous Gold Thread, Buddha’s Proper Hand |
| Baw-Li-Guhh-Baw | Webbed Hole, Center Hole | Refined Iron Sand, Tadpole |
| Zhu Bajie | Webbed Hole, Hut of Immortality | TBA |

How one can beat Black Delusion Wukong bosses
Finding each boss in Black Delusion Wukong is one factor, however defeating them is one other. We’ve included a choice of methods to beat probably the most troublesome Black Delusion Wukong bosses you’re prone to encounter. Every entry features a common overview of every boss and their moveset, together with the perfect Black Myth Wukong spells, abilities, and armor that will help you counter it.

Guangzhi
Guangzhi could be an teacher within the rules of Buddhism, however don’t count on him to go straightforward on you. This wolf-headed monk wields a fiery, double-headed glaive in a set of swish but lethal strikes that demand cautious dodging to keep away from. He twirls it round himself to create a circle of fireplace you possibly can simply get caught up in in the event you’re not quick in your toes. Guangzhi is inclined to charged heavy assaults, so use Immobilize to freeze him in place and expend your focus level.
You could be tempted to maintain your distance, however don’t stray too far. Guangzhi can shut the hole with a swift ahead cost from the bottom or air. He also can throw his glaive in a straight line immediately forward; it follows the identical path to return to its grasp’s hand, so keep clear to keep away from a backstab. Lastly, be careful for the succession of downward strikes when he cartwheels towards you. This assault is simple to interrupt, nevertheless it requires cautious timing to keep away from taking injury within the course of.

Lingxuzi
Lingxuzi is a hyper-aggressive boss that opts to make use of its tooth and claws in battle, with a moveset full with ahead lunges and diagonal sweeps. It additionally loves to shut gaps by leaping into the air; anticipate the quick pause earlier than it pounces to keep away from being baited into an early dodge. These frenzied assaults could be relentless and you could discover the digicam is your worst enemy on this struggle. Nonetheless, Lingxuzi is very inclined to fireside, so don’t hesitate to make use of the Teacher Daolang transformation to set its pelt alight. He’s additionally simply staggered by charged heavy assaults, notably in the event you land one on his head. As soon as it loses 1 / 4 of its well being, Lingxuzi leaps onto the encompassing buildings to reposition for an overhead pounce, so hold a eager eye and lightweight foot to slay this beast.

Elder Jinchi
Elder Jinchi is the principle secret boss in Black Wind Mountain and a significant antagonist in Journey to the West, so defeating him isn’t any straightforward feat. He’s an imposing determine in his personal proper, delivering a sequence of swipes, stomps, and leap assaults. He also can unleash a fast burst of vitality along with his raised palm, so attempt to keep away from standing immediately in entrance of him when his proper hand glows golden.
Sometimes, Elder Jinchi slams his fist into the bottom to create an AoE that expands in three concentric circles, so hold your distance and use this time to heal and swig a drugs or two. He also can name upon the non-hostile monks to run to your location and explode, so disengage from Elder Jinchi and give attention to sprinting out of their attain. At half well being, Elder Jinchi levitates into the air and may soak up close by monks to revive his well being. Take them out earlier than they’ll come shut, and solid Crimson Tides to offset any profitable therapeutic as soon as he turns into susceptible once more.

Black Bear Guai
Black Bear Guai is the ultimate Black Delusion Wukong boss in chapter one, and also you’re liable to make use of all of the spells, talents, and transformations you’ve collected to this point to beat him. His colossal dimension makes him troublesome to dodge, and his second part turns the battlefield right into a raging inferno that inflicts burn injury over time in the event you stand within the unsuitable place. Nonetheless, we’ve acquired loads of tricks to counter this blazing bear, so try our devoted technique information for the Black Myth Wukong Black Bear Guai boss struggle to dampen his fiery spirit and gather your first relic.

King of Flowing Sands and Second Rat Prince
This royal father-son duo won’t be on the identical problem as soulslike kings Ornstein and Smough, however they’re nonetheless a formidable pair. The Second Rat Prince serves as the principle offensive line, wielding a heavy membership that he can spin and slam into the bottom. He also can swing it to ship a line of vitality in your course, so we advocate dodging sideways as typically as potential. Whereas the King of Flowing Sands lets his son do all of the heavy lifting, he spends most of his time on the high of the close by pillar, throwing rocks and insults. Put your self between the 2
The King of Flowing Sands and Second Rat Prince have separate well being bars, so it’s as much as you to determine which one to prioritize first. You possibly can attain the King of Flowing Sands whereas he’s on the pillar utilizing the Pillar Stance, however your finest guess is to make use of Immobilize when he’s on the bottom to focus on him with out leaving your self extensive open to assault from the Prince. Nonetheless, killing the King first causes the son to enter a berzerk mode for the remainder of the struggle. The Prince hits tougher, quicker, and unleashes extra projectiles than in his first part. As an alternative, we advocate concentrating on the Second Rat Prince, leaving the King of Flowing Sands totally at your mercy.

Tiger Vanguard
Tiger Vanguard is as near a ability examine as Black Delusion Wukong bosses get. He’s extra relentless than any boss that’s come earlier than it – and with the restricted spells and ability factors you’ve managed to accrue at this level in your journey, you possibly can’t afford to place a foot unsuitable. Our devoted technique information to the Black Myth Wukong Tiger Vanguard boss struggle is important studying if you wish to keep away from being lower down by its claws and katana. Finally, Tiger Vanguard is an train in managing greed, so keep on the defensive and take the alternatives as they arrive.

Stone Vanguard
Stone Vanguard is a hulking golem that’s fairly a bit slower than the bosses that come earlier than it, making it simpler to dodge than most – in truth, it’s so gradual you could be susceptible to dodging too early. Watch out of its sweep when attacking from behind, since he can simply clip you. As an alternative, your finest guess is to stay at a distance and bait it right into a leap, since staying shut leaves you susceptible to its close-range AoE. Staying at lengthy vary is extra prone to set off a sequence of pincer slams whereas shifting towards your place that culminates in an overhead slam. Nonetheless, that is simply avoidable, and we advocate exploiting Stone Vanguard’s gradual tempo to make the most of the Azure Mud transformation and punish accordingly.

Macaque Chief
Macaque Chief is a recurring boss all through chapter two, and every confrontation turns into progressively tougher. The Macaque Chief is a monkey with a robust weapon and an iron will (identical to you!) so that you already know you’re in for a problem. It favors its one-handed saber in battle, although it’s going to sometimes wield it with its toes to go away its fingers free for a sequence of livid swipes. Whereas the fundamental sword slashes are simply averted, it has two main assaults: a ahead slash that triggers a vertical projectile and an overhead leap that culminates in a whirlwind AoE.
The snow area is Macaque Chief’s pure habitat, so it ought to come as little shock that fireplace talents are your finest guess right here. Fortunately, Macaque Chief has restricted safety and is susceptible to getting staggered, so the primary few encounters shouldn’t be too troublesome. It’s far harder throughout your showdown with Yellowbrow, with extra aggressive assaults – nonetheless, Zhu Bajie involves your help, so let him draw aggro each time that you must disengage from Macaque Chief to heal.

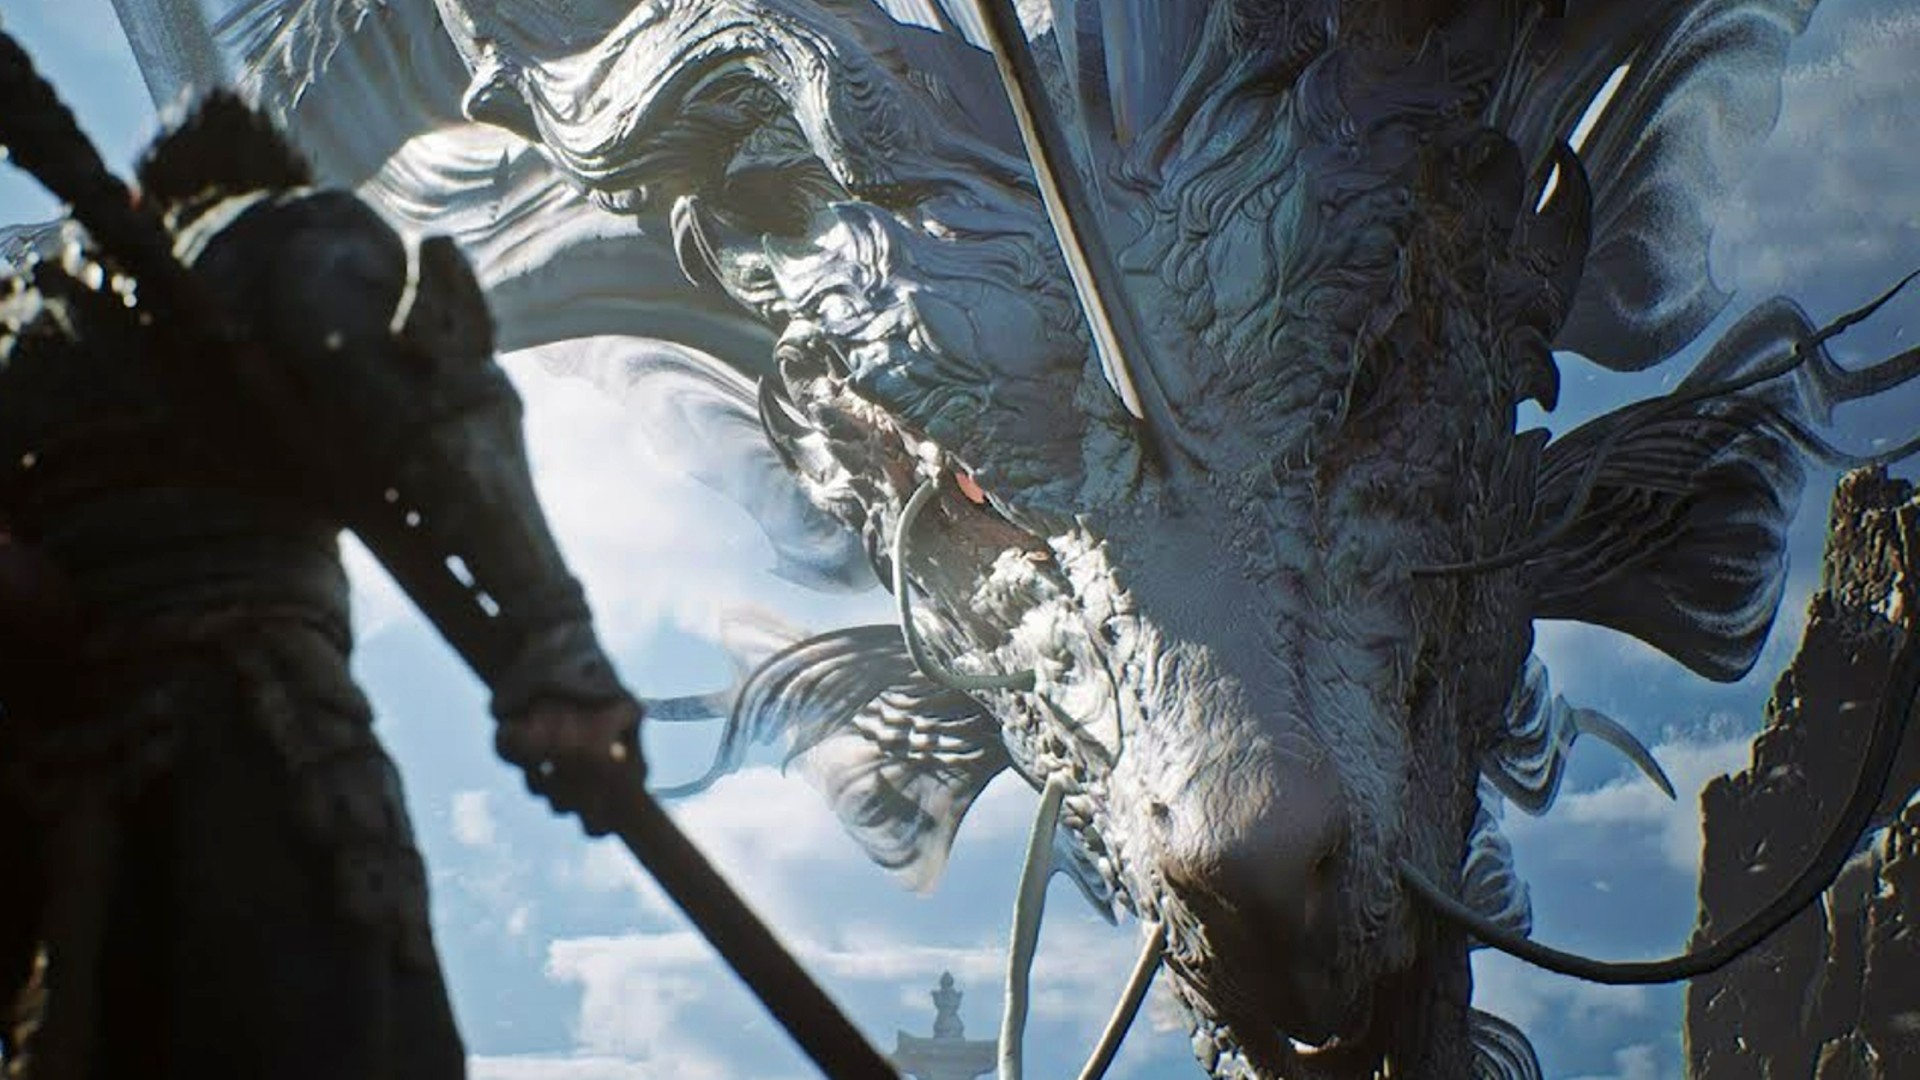
Kan-Jing Loong
Kan-Jing Loong is a colossal white dragon that patrols the skies above a desolate ice lake, which serves because the treacherous enviornment to your battle. Your overhead strikes and pole vault can provide the top required to achieve it within the air, and touchdown an assault on its snout could cause it to stagger. Kan-Jing Loong could be knocked to the bottom in the event you deal sufficient injury – there are not any apparent weak factors to focus on, so simply take the chance to get as many hits as potential earlier than it retakes flight.
Like all Black Delusion Wukong dragon bosses, Kan-Jing Loong has a set of electrical assaults at its disposal, together with a devastating electrical beam that emerges from its mouth. Be careful for the road of electrical energy it sends towards you when it touches the bottom and the electrical explosion throughout its tail slam assault. Its deadliest transfer is a cost assault that triggers a near-fatal animation if it collides, so dodge early to keep away from it. Lastly, be careful for the cascade of lightning strikes that engulf the sector in the direction of the top of the battle, which calls for you to give attention to sprinting and dodging to remain alive.

Centipede Guai
Regardless of its identify, Centipede Guai resembles a colossal woodlouse, with a thick carapace that soaks up injury. In basic Darkish Souls style, the easiest way to keep away from hurt throughout its leap assault is to dodge forwards. This maneuver will put you behind it, supplying you with a couple of valuable moments to inflict injury; simply you’ll want to keep away from its backward physique slam after it recovers. Fortunately, this place is when Centipede Guai is at its most susceptible, and a plunging strike to its uncovered abdomen can take off a piece of its well being in a single blow.
At half well being, Centipede Guai summons a military of smaller centipedes that explode on influence, inflicting poison injury. There’s no foolproof method to destroy them, so dash out of their path till they despawn. Lastly, Centipede Guai periodically spews poison from its mouth, which you’ll be able to anticipate when it pauses to shake its head back and forth. These poison swimming pools stay for a brief interval, so take care to not step in them earlier than they disappear – particularly when Centipede Guai is rolling across the battlefield.

Black Loong
Black Loong is a stout desert dragon that dual-wields maces imbued with electrical energy. A lot of Black Loong’s swings embody a nasty pause that may bait unwitting gamers into an early dodge, however you too can exploit this to get a free hit in earlier than a profitable evasion. Nonetheless, Black Loong’s AoE assaults can nonetheless catch you off guard. It slams its maces into the bottom repeatedly, so get able to dodge or leap over the electrical AoE assaults that unfold outwards in a round radius at every level of influence. Be careful for the lighting spark on the end result of this assault, and sprint in to inflict injury whereas it recovers. It will possibly additionally twirl its maces collectively to summon {an electrical} storm within the fast neighborhood, so again off and hold your distance till it stops. Black Loong is nowhere close to as quick as Tiger Vanguard or Wolf Demon, however casting Immobilize can disrupt its AoE assault patterns and prevent from an early demise.

Toxic King
Toxic King makes use of his scorpion stinger simply as a lot as his claws, so parrying is your finest guess. His moveset is replete with prolonged assault strings that may trigger you to develop into overwhelmed, so we advocate Immobilize for a simple disengage. His scorpion tail has stunning attain when he makes use of it for a ahead strike; don’t assume that placing distance between you and Toxic King will probably be sufficient to maintain you from hurt. As an alternative, summon clones to divide his consideration in the event you want a transparent second to heal. True to his identify, Toxic King’s stinger drips lethal poison, and he may even slam it into the bottom to spawn poison swimming pools in your neighborhood. You’ll want to sprint out of their perimeter earlier than they explode, and benefit from Toxic King’s immobility throughout this assault to punish accordingly.

Mi Dao Ren
Mi Dao Ren could be smaller than a number of the different Black Delusion Wukong bosses you’ve confronted to this point however don’t underestimate him. This masked monk is extremely swift, alternating Shaolin kicks and katana slashes that make him robust to overpower at shut vary. You possibly can safely dodge out of his attain till his second part, the place he undergoes a horrific transformation and inflicts close-range AoE poison assaults throughout fight. Mi Dao Ren’s actions are clumsier on this type, however his assaults boast far better attain; he can shortly shut a niche with a ahead cost that culminates in an AoE burst of poison. Keep on the defensive, chorus from prolonged assault combos, and it’s best to have the ability to defeat Mi Dao Ren earlier than you succumb to his poison.

Blood Moon Common
Blood Moon Common places you at a pure drawback in an enviornment with no verticality. This newly birthed beast can be fairly huge, and it has a behavior of launching itself into the air for a plunging assault. It shoots spines from its wings in a horizontal formation, so be sure to dodge towards them as an alternative of making an attempt to sidestep out of their path. In the direction of the top of its first part, Blood Moon Common roars and flaps its wings earlier than initiating a prolonged cost assault that may ship some severe injury in the event you get caught in it. After three prices throughout the size of the sector, Blood Moon Common collapses, supplying you with an enormous window of alternative to dish out some injury of your personal.
Blood Moon Common’s second part is a really completely different beast insofar as its moveset. Each time it brandishes its weapon, be ready to dodge its projectiles; these horizontal and diagonal purple slashes journey at some pace, and we advocate sidestepping then dodging forwards as soon as Blood Moon Common leaps into the air to deliver its sword down. This leaves you in shut sufficient vary to squeeze in a success or two earlier than it recovers. Sometimes, it plunges its weapon into the bottom, supplying you with solely moments to dodge the colossal AoE that triggers when it slams its foot into the hilt.
There’s no query this second part is a troublesome struggle; you’ve additionally acquired to account for the purple haze that descends on the sector throughout this part, making it tougher to see at a distance. Nonetheless, a lot of Blood Moon Common’s strikes are simply superior variations of its first part, so attempt to not be too intimidated. Depend on Immobilize when in dire straits, and be careful for when it pauses its assault to vomit, which serves as your cue to place your self behind it for some free hits.

Chiran Loong / Crimson Loong
Like Black Loong, Crimson Loong’s moveset is chock-full of electrical assaults that pack a punch. You could be tempted to stay at a distance, however the lowered visibility in Crimson Loong’s area means you gained’t have the ability to anticipate its assaults. It’s additionally susceptible to performing an electrified tail whip at mid-range, which you’ll be able to simply predict and dodge via each time Crimson Loong turns its again. As an alternative, we advocate a close-range frontal assault – simply keep away from its tooth and claws.
Each time it collapses on its facet, goal the nodes on its again earlier than it recovers to take a piece out of its well being in a single burst. Crimson Loong’s electrical AoE assaults are probably the most deadly in its arsenal, so keep in mind to retreat when the nodes on its again start to crackle. A haze of golden mud seems moments earlier than the AoE triggers, so you’ll want to get out of its perimeter and goal Crimson Loong the place potential.
Now that you simply’re ready to beat the Black Delusion Wukong bosses, try our Black Myth Wukong review to get our definitive ideas on Sport Science’s reimagining of Journey to the West. Alternatively, uncover the Black Myth Wukong mocap cats working time beyond regulation to deliver the soulslike game’s bipedal creatures to life.


