Why Use MQTT with Meshtastic?
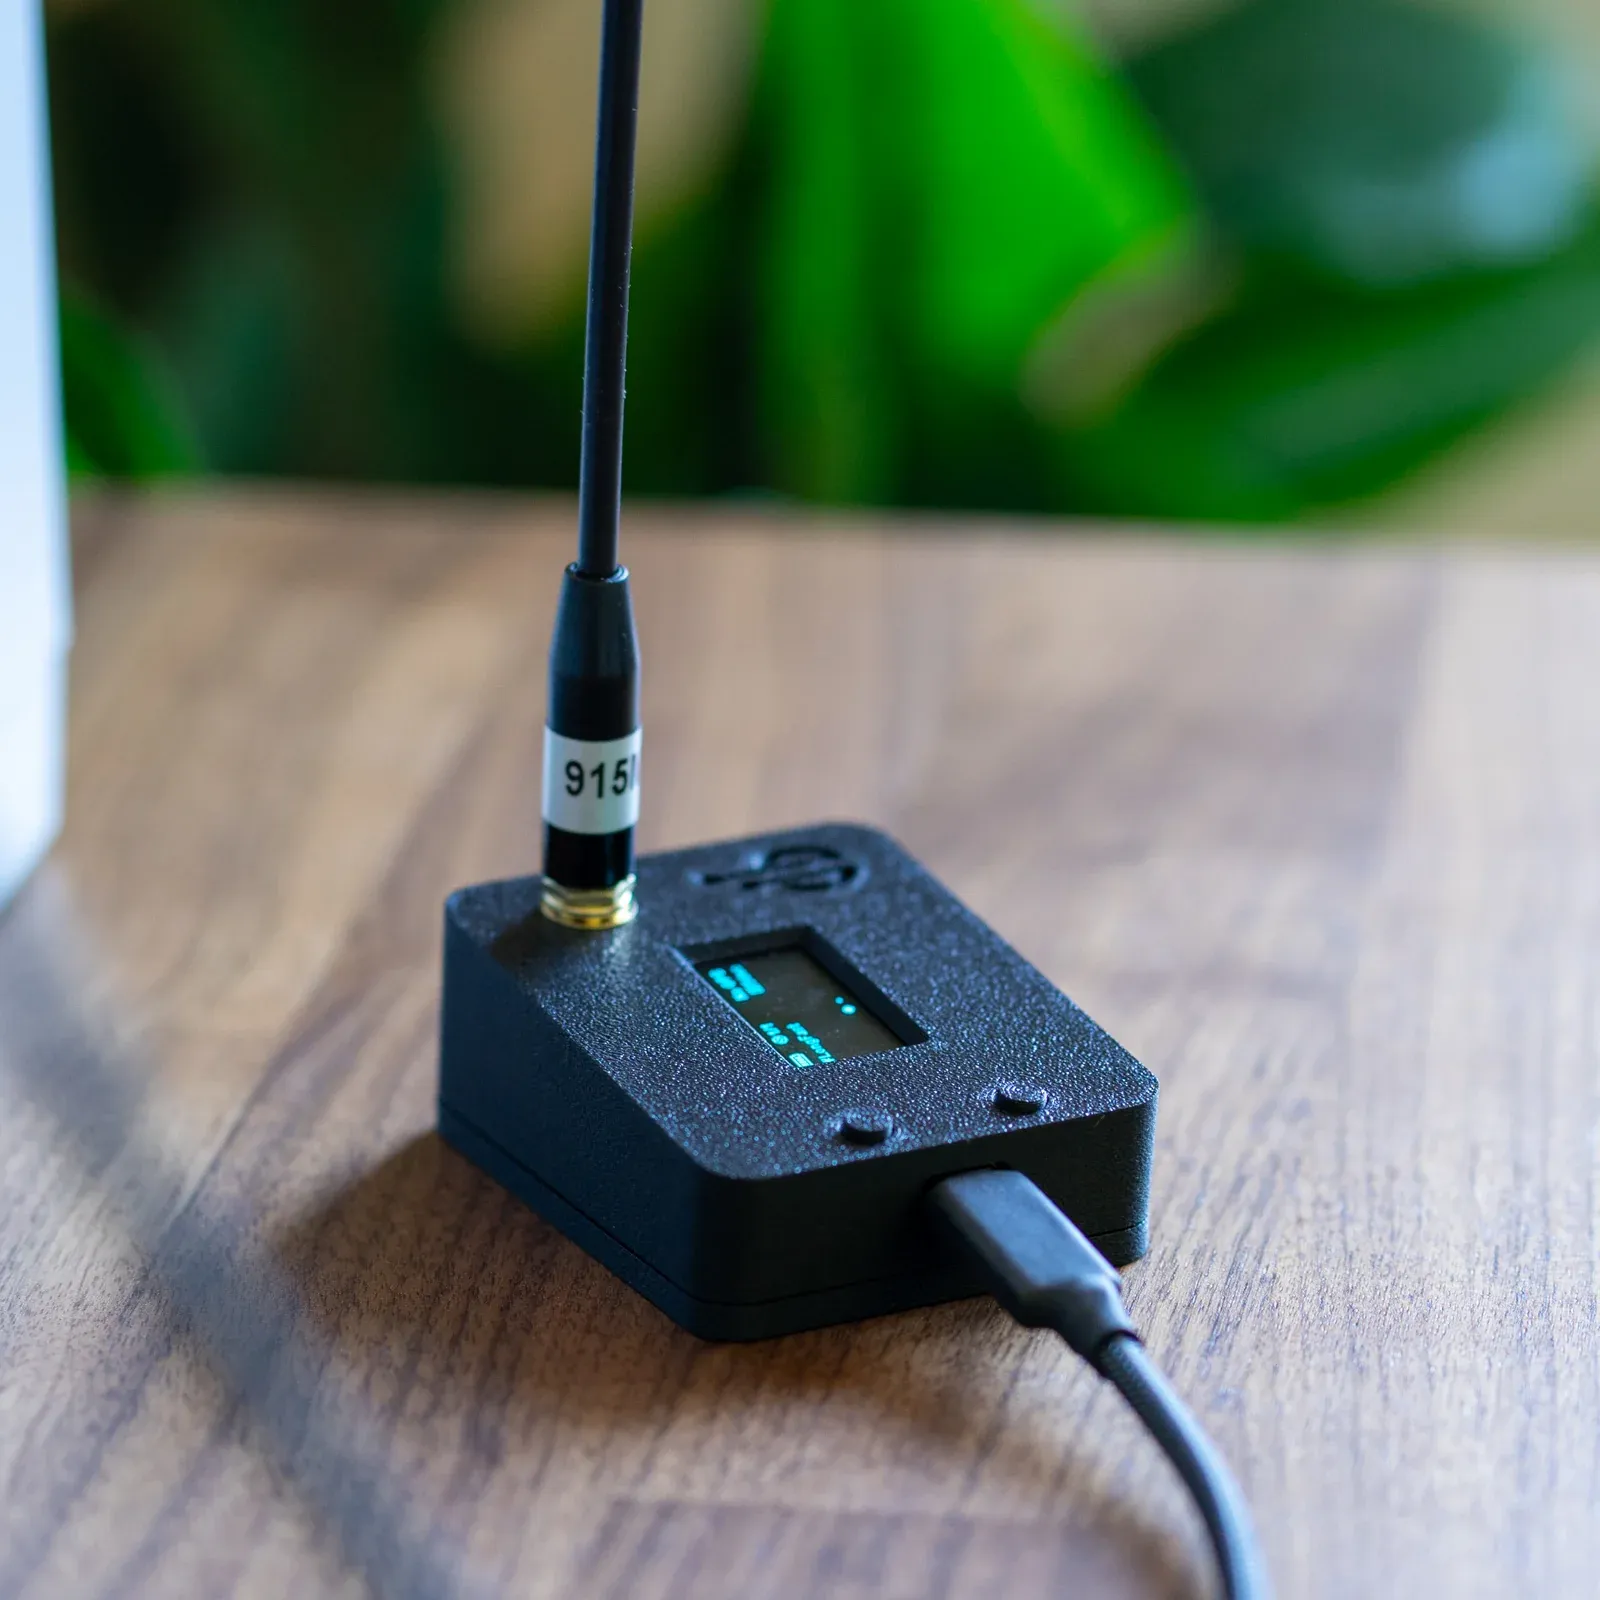
Meshtastic is an off-grid communication gadget that permits customers to ship messages with out counting on conventional web or mobile networks. It makes use of mesh networking, permitting messages to hop from one gadget to a different till they attain their vacation spot. This functionality is invaluable for communication in distant areas, throughout outside adventures, or in emergency conditions the place typical communication infrastructure is unavailable.
Meshtasic Devices AliExpress Official Stores
Discover reliable sources for Meshtastic-supported boards on AliExpress. From LILYGO T-Echo to WisBlock Meshtastic Starter Kit, find genuine products and save time with consolidated purchases. Dive into IoT and mesh networking with confidence!
Nonetheless, whereas Meshtastic excels at native off-grid communication, there could also be eventualities the place you could join teams which can be geographically separated by vital distances, resembling in several elements of the world. Moreover, there could also be conditions the place you do not need a direct sign to the mesh community however nonetheless wish to talk. That is the place MQTT (Message Queuing Telemetry Transport) can play a vital position.
MQTT is a light-weight messaging protocol designed for low-bandwidth, high-latency, or unreliable networks. By integrating MQTT with Meshtastic, you possibly can create a gateway gadget that serves as a bridge between two or extra distant Meshtastic networks and in addition present a backup communication path when the mesh sign is weak or unavailable. Right here’s how this works intimately:
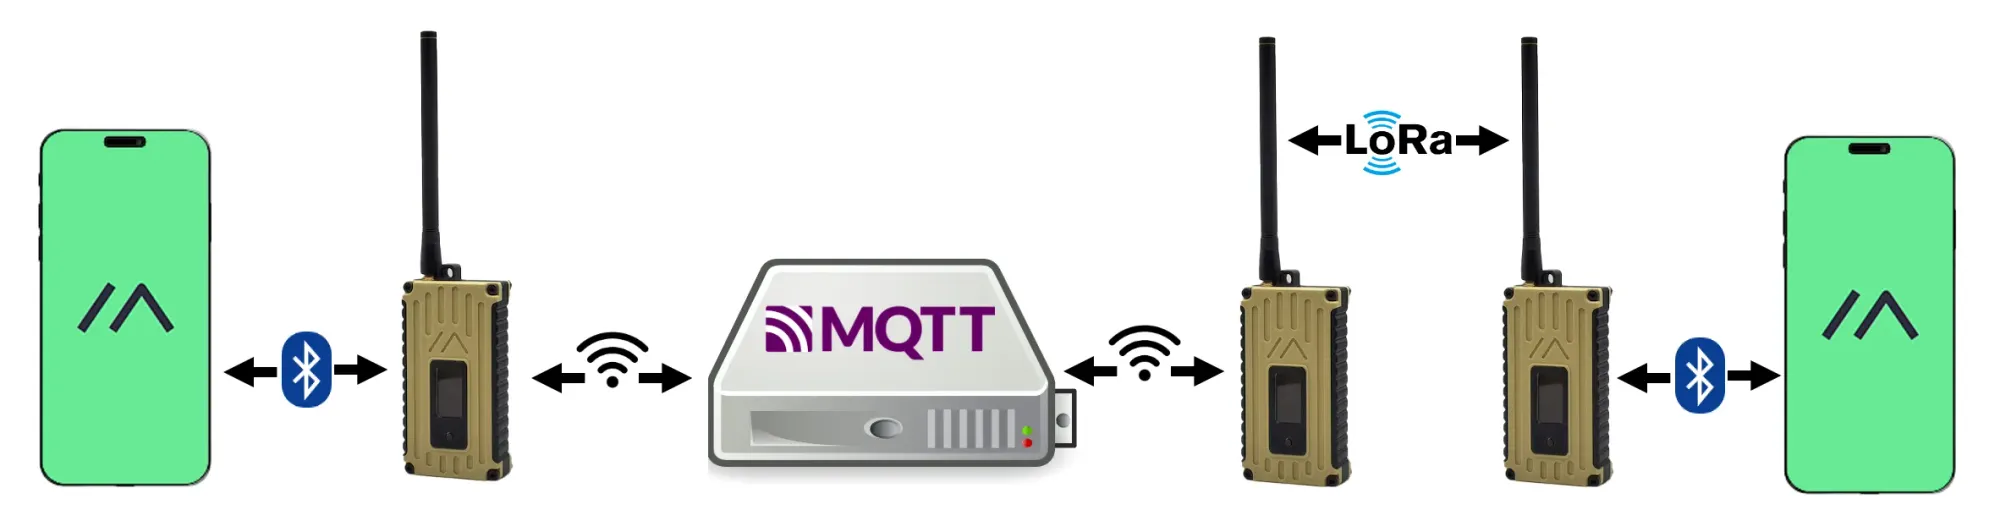
- Native Communication: Every group, utilizing Meshtastic gadgets, can talk freely inside their native mesh community. Because of this gadgets in Group A (situated in a single a part of the world or far neighborhood) can ship messages to one another with none web or Wi-Fi connection. The identical applies to Group B in one other location.
- Gateway Machine: To attach these two teams, a Meshtastic gadget/s (Multiple gadget can act as a gateway for redundancy) inside every group may be designated as a gateway. This gateway gadget may have a further connection to the web or a neighborhood community able to operating an MQTT dealer.
- MQTT Integration: The gateway gadget in Group A connects to an MQTT dealer (a server that routes messages between MQTT shoppers). This dealer may be hosted on a neighborhood server or a cloud service. The gateway gadget publishes messages from the native mesh community to a selected MQTT subject. Equally, it subscribes to a different subject to obtain messages from the MQTT dealer.
- Message Relay: The MQTT dealer acts as an middleman. When the gateway gadget in Group A publishes a message to the MQTT subject, the MQTT dealer receives it after which forwards it to the gateway gadget in Group B, and vice versa. This enables messages to be relayed between the 2 teams regardless of the huge distances separating them.
- International Communication: By means of this setup, Group A and Group B can now talk with one another as in the event that they had been a part of the identical native community. The usage of MQTT as a bridge ensures that messages are effectively transmitted between the 2 distant teams, leveraging the strengths of each Meshtastic for native communication and MQTT for long-range message relaying, creating a flexible and highly effective communication community.
- Backup Connection: In instances the place there isn’t a sign to the mesh community or the mesh sign is weak, the MQTT gateway offers a dependable backup connection. This ensures steady communication even when the first mesh community is just not out there.
- Sooner Messaging: MQTT messages may be transmitted a lot sooner over the web in comparison with the mesh community. Throughout occasions when web entry is obtainable, MQTT can offload a few of the site visitors from the mesh community, making certain sooner and extra environment friendly message supply.
Best Antenna For Meshtastic Handheld Node
Explore the top Meshtastic antennas with our detailed guide. From GIZONT to ZIISOR and CDEBYTE, find the perfect fit for your needs. Get insights, pros, cons, and convenient AliExpress links for easy purchasing. Make an informed decision today!
How you can Set up MQTT with Docker
1. Set up Docker
First, you will want to put in Docker. The most recent directions can be found on the Docker web site. Alternatively, you need to use the next script to put in Docker:
curl -fsSL https://get.docker.com -o get-docker.sh
sh get-docker.sh
2. Create a Base Folder for MQTT Configuration
Create a listing to carry your MQTT configuration recordsdata:
mkdir mqtt5
cd mqtt5
mkdir config
This setup will retailer the mosquitto.conf file and the pwfile for password administration.
3. Create the Mosquitto Configuration File
Create the Mosquitto configuration file:
nano config/mosquitto.conf
Add the next primary configuration content material, together with WebSocket help:
allow_anonymous false
listener 1883
listener 9001
protocol websockets
persistence true
password_file /mosquitto/config/pwfile
persistence_file mosquitto.db
persistence_location /mosquitto/information/
4. Create the Mosquitto Password File
Create an empty password file:
contact config/pwfile5. Create the Docker-Compose File
Create a docker-compose.yml file with the next content material:
nano config/mosquitto.conf
nano docker-compose.yamlmodel: "3.7"
providers:
mqtt5:
picture: eclipse-mosquitto
container_name: mqtt5
ports:
- "1883:1883" # Default MQTT port
- "9001:9001" # MQTT port for WebSockets
volumes:
- ./config:/mosquitto/config:rw
- ./information:/mosquitto/information:rw
- ./log:/mosquitto/log:rw
restart: unless-stopped
6. Create and Run the Docker Container for MQTT
If you do not have Docker Compose put in, you possibly can set up it with:
sudo apt set up docker-compose
Run the Docker container:
sudo docker-compose up -d
Verify if the container is operating and observe the container ID:
sudo docker ps
7. Create a Consumer/Password within the pwfile
Log in interactively to the MQTT container:
sudo docker exec -it <container-id> shCreate a brand new password file and add a consumer (it can immediate for a password):
mosquitto_passwd -c /mosquitto/config/pwfile user1So as to add extra customers (with out the -c choice):
mosquitto_passwd /mosquitto/config/pwfile user2To delete a consumer:
mosquitto_passwd -D /mosquitto/config/pwfile <user-name-to-delete>
Exit the container:
exit
Restart the container to use modifications:
sudo docker restart <container-id>How you can Set up MQTT on Home windows
1. Obtain and Set up Mosquitto
Obtain the Mosquitto installer from the official Mosquitto website. Run the installer and observe the on-screen directions.
2. Configure Mosquitto
After set up, configure Mosquitto:
- Navigate to the Mosquitto set up listing (often
C:Program FilesMosquitto). - Open
mosquitto.confin a textual content editor and configure it as wanted. You need to use the identical configuration settings as talked about earlier for Docker.
allow_anonymous false
listener 1883
listener 9001
protocol websockets
persistence true
password_file /mosquitto/config/pwfile
persistence_file mosquitto.db
persistence_location /mosquitto/information/
3. Begin Mosquitto
Begin Mosquitto utilizing the command immediate:
cd "C:Program FilesMosquitto"
mosquitto -c mosquitto.conf
How you can Set up MQTT on Linux
1. Set up Mosquitto
Set up Mosquitto utilizing your package deal supervisor:
sudo apt set up mosquitto2. Configure Mosquitto
Edit the Mosquitto configuration file:
sudo nano /and many others/mosquitto/mosquitto.confAdd the next configuration:
bashCopy codeallow_anonymous false
listener 1883
listener 9001
protocol websockets
persistence true
password_file /and many others/mosquitto/pwfile
persistence_file mosquitto.db
persistence_location /var/lib/mosquitto/
3. Create the Password File
Create a password file and add a consumer:
contact /and many others/mosquitto/pwfile
sudo mosquitto_passwd -c /and many others/mosquitto/pwfile user1
4. Begin Mosquitto
Begin the Mosquitto service:
sudo systemctl begin mosquitto
sudo systemctl allow mosquitto
💡
To make sure which you can connect with your MQTT dealer, you will have to know the IP deal with or area title of the machine the place the dealer is operating. Moreover, you will need to ensure that the required MQTT ports are open and accessible
FPV Drone Build Under 300$ With Goggles & Controller
Learn how to build a custom FPV drone for under $300, complete with goggles and a controller. Our guide provides step-by-step instructions and carefully curated component selections. Start your FPV journey today!

Settings for Meshtastic
As soon as your MQTT dealer is operating, configure your Meshtastic nodes to connect with it:
- Go to Settings
- Then MQTT
- Enabled: Allow the MQTT module.
- MQTT Proxy Enabled: Let the gadget use the telephone’s community connection to connect with the MQTT server.
- Encryption Enabled: Allow this if you would like encrypted packets.
- JSON Disabled: For our use, we are going to disable JSON packet help for simple integration with different techniques.
- Map Reporting Enabled: Periodically ship a map report back to the MQTT server.
- Map Report Publish Interval: Set how usually the map report is revealed.
- Map Report Place Precision: Set the precision for the place within the map report.
- Root Matter: Set a root subject for organizing your MQTT messages. ‚ msh/mymesh
- Server Deal with: Set the deal with of your customized MQTT server.
- Username: The username in your MQTT server.
- Password: The password in your MQTT server.
- TLS Enabled: TLS for a safe connection you probably have configured SSL certificates in your server. For this tutorial, we are going to disable it for now.
- Return to settings
- Then Channels
- Select the channel you wish to allow MQTT for, Allow Uplink/Downlink
Integrating MQTT with Meshtastic considerably enhances the capabilities and flexibility of off-grid communication networks. Meshtastic excels at facilitating native communication by means of mesh networking, making certain sturdy and dependable message supply even within the absence of conventional web or mobile connectivity. Nonetheless, by incorporating MQTT, you possibly can bridge geographically dispersed Meshtastic networks, enabling seamless international communication.
MQTT serves as a light-weight, environment friendly messaging protocol that operates nicely over low-bandwidth and high-latency networks. This makes it a really perfect selection for connecting Meshtastic networks throughout huge distances. The mixing includes organising a gateway gadget inside every native mesh community that connects to an MQTT dealer, permitting messages to be relayed effectively between distant teams.
This setup not solely extends the attain of Meshtastic networks but in addition offers a dependable backup communication path when the mesh sign is weak or unavailable. Moreover, MQTT can expedite message supply throughout occasions when web entry is obtainable, offloading some site visitors from the mesh community and making certain sooner communication.
By leveraging each Meshtastic and MQTT, customers can keep steady, dependable communication throughout native and international scales, making this mixed answer invaluable for distant areas, outside adventures, and emergency conditions. This integration successfully marries the strengths of native mesh networks with the worldwide attain of MQTT, creating a strong and resilient communication community.


